
After you install the EDocGen package from AppExchange, complete these steps so Generate Document works: update the Named Credential, create action buttons, and save EDocGen Configuration[cite: 9].
The package includes an EDocGen Named Credential[cite: 9]. Update it with your account credentials so Salesforce can authenticate to the EDocGen server[cite: 9].
edocgenusername@gmail.com)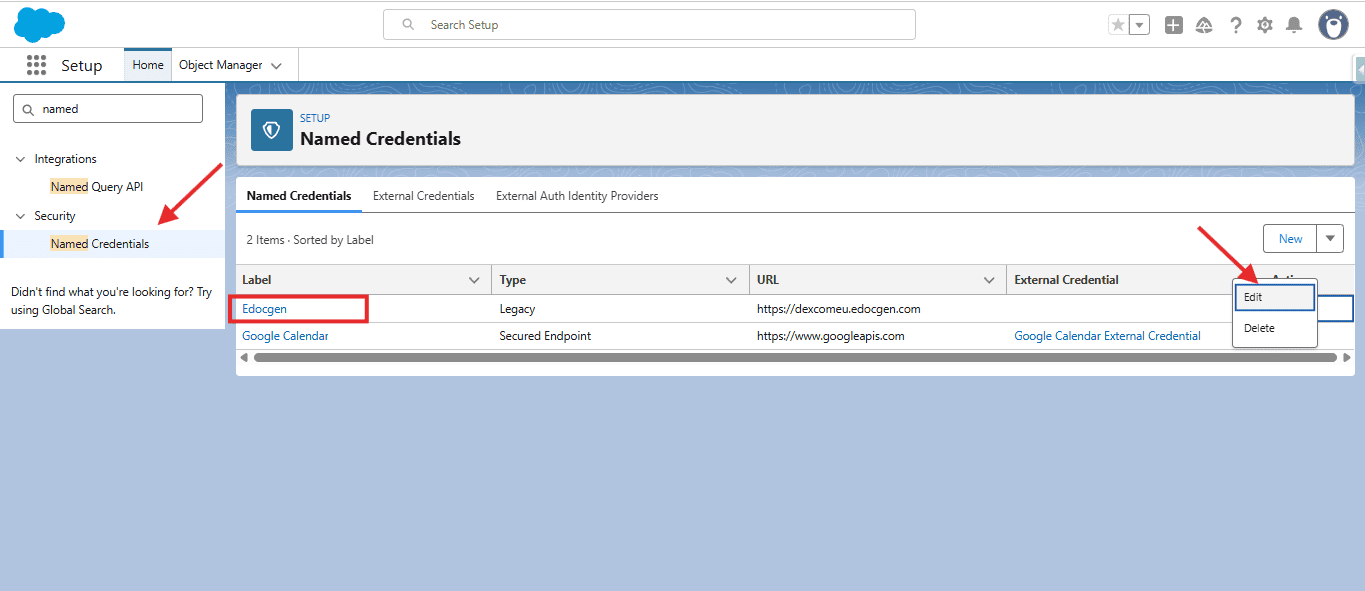
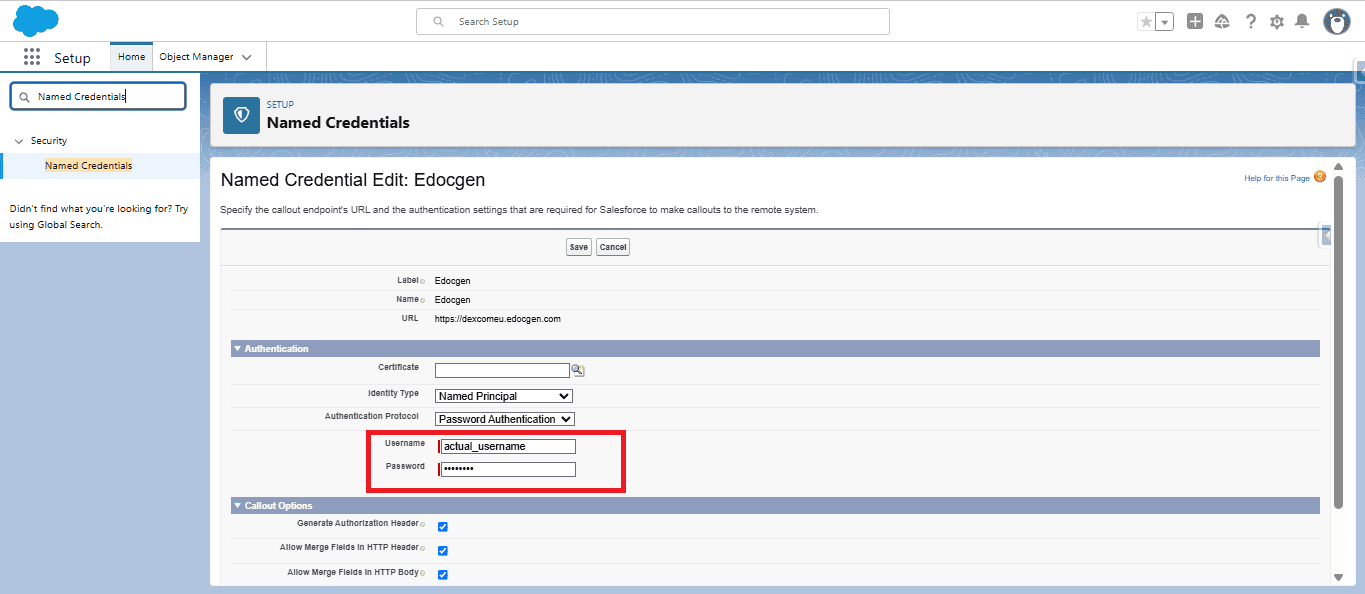
Click Save[cite: 9].
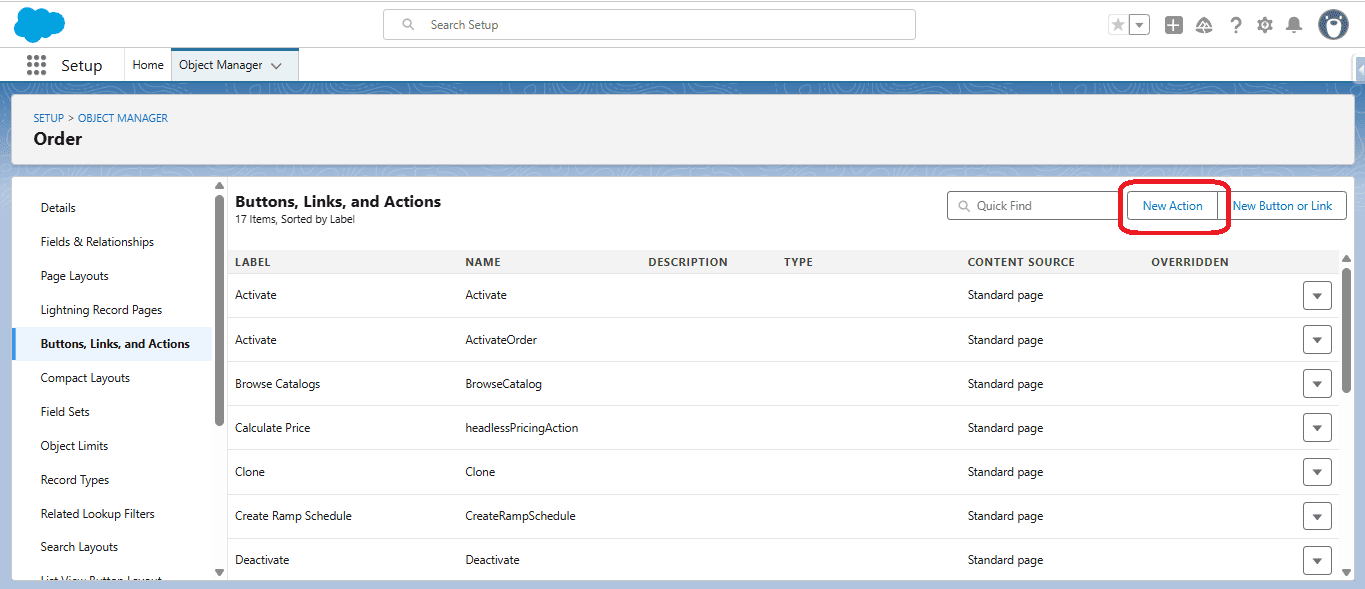
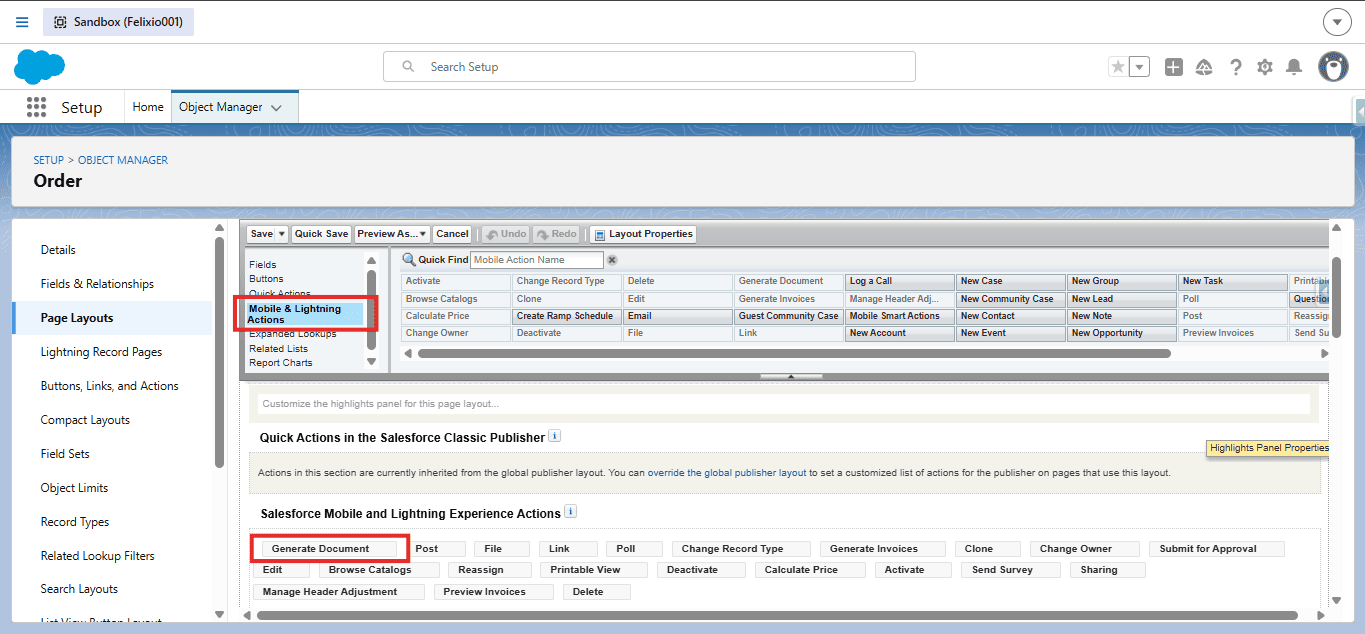
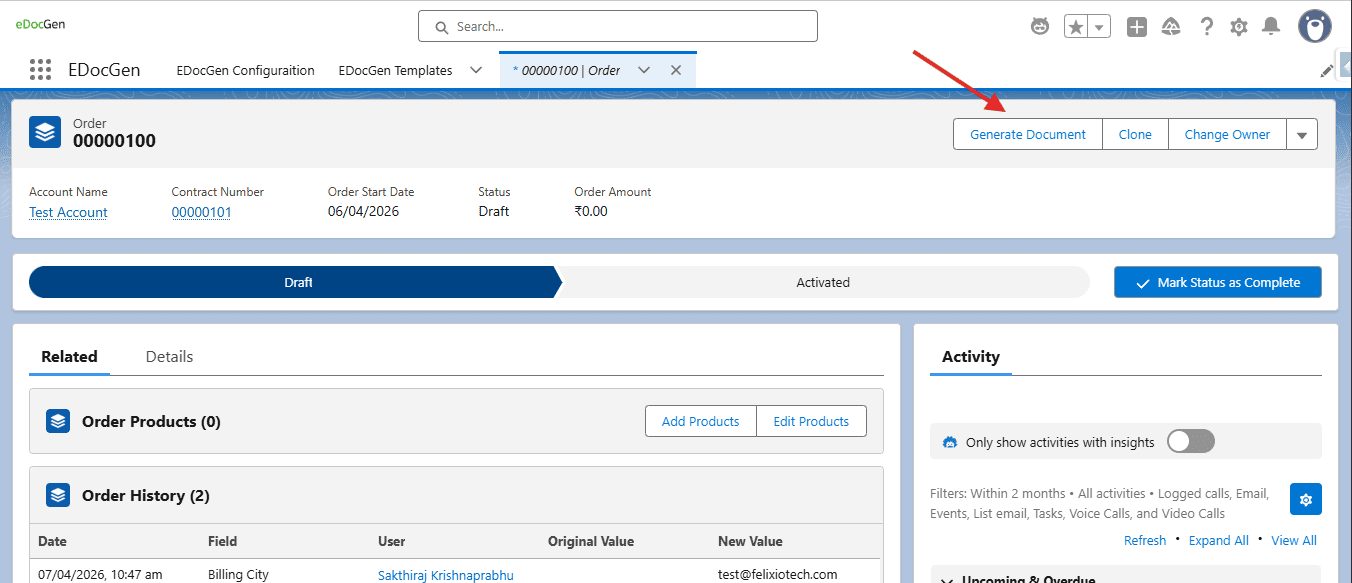
You can add Generate Document on any object (for example, Contract, Order, Account)[cite: 9]. Create a Lightning Action for single-record generation and/or a List Button for bulk generation[cite: 9].
| Field | Value |
|---|---|
| Action Type | Lightning Component[cite: 9] |
| Lightning Component | edocgen:Templates[cite: 9] |
| Height | 250px (default; change if needed)[cite: 9] |
| Label | e.g. Generate Document[cite: 9] |
| Name | e.g. Generate_Document[cite: 9] |
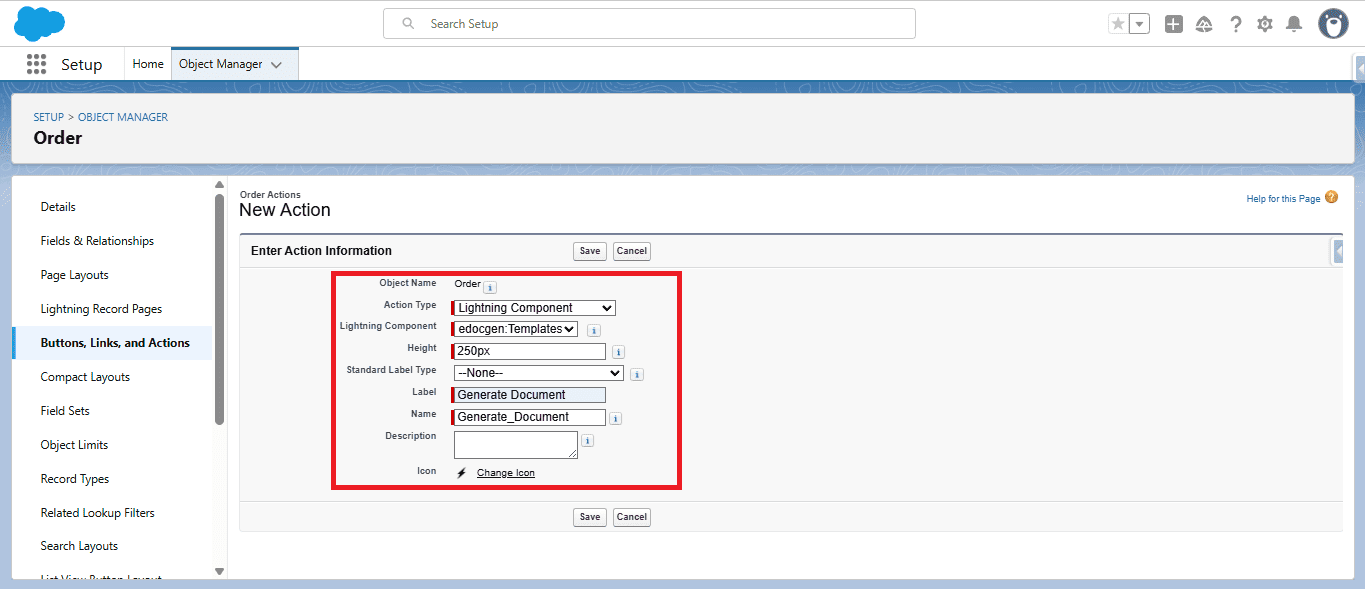
Click Save, then add the action to the page layout[cite: 9]:
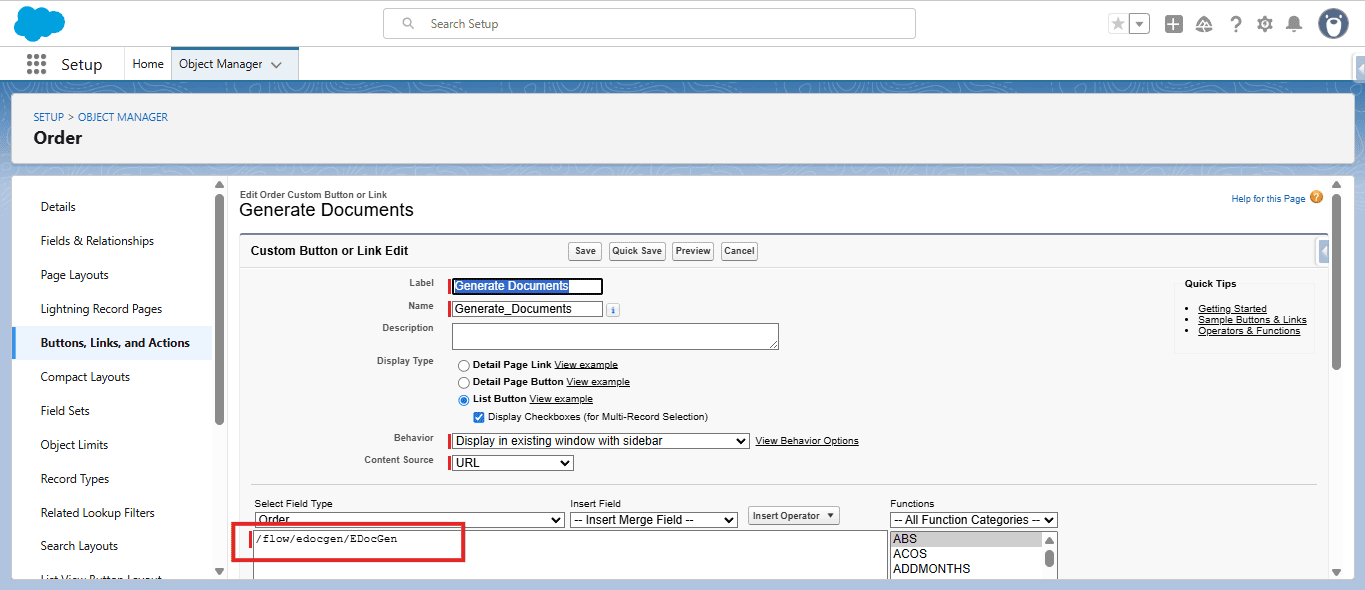
| Field | Value |
|---|---|
| Label | e.g. Generate Documents[cite: 9] |
| Display Type | List Button[cite: 9] |
| Behavior |
Display in existing window with sidebar or without sidebar or without sidebar or header[cite: 9] |
| Content Source | URL[cite: 9] |
| URL | /flow/edocgen/EDocGen[cite: 9] |
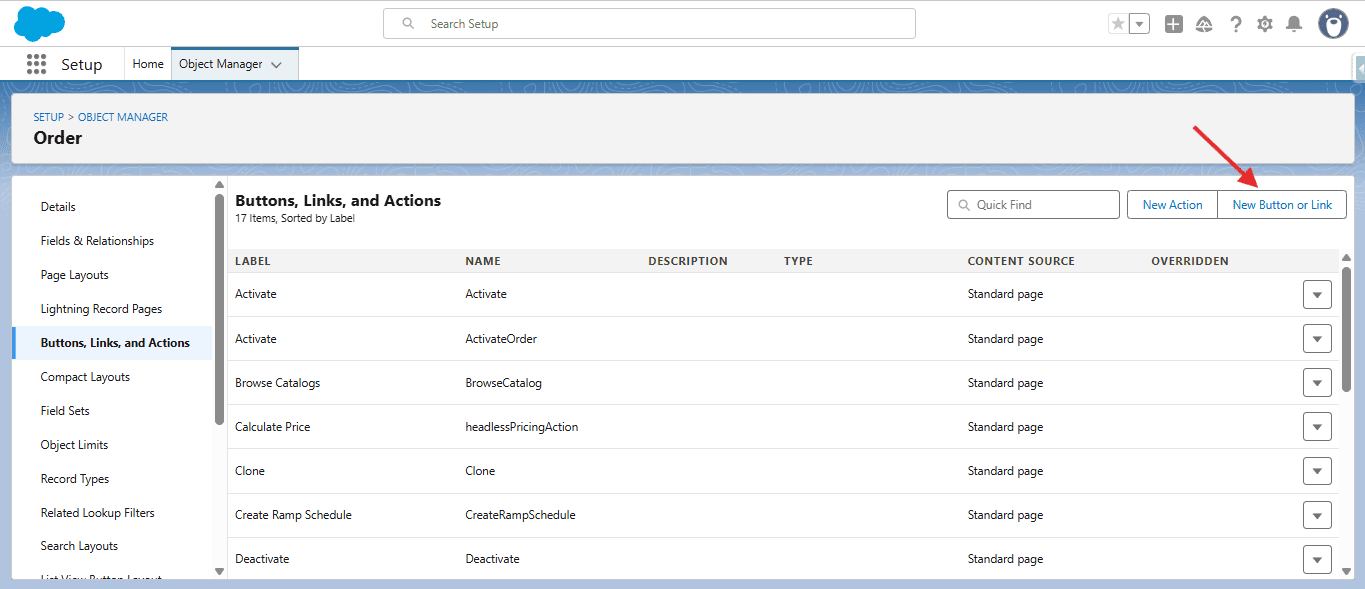
Attach the button to the list view[cite: 9]:
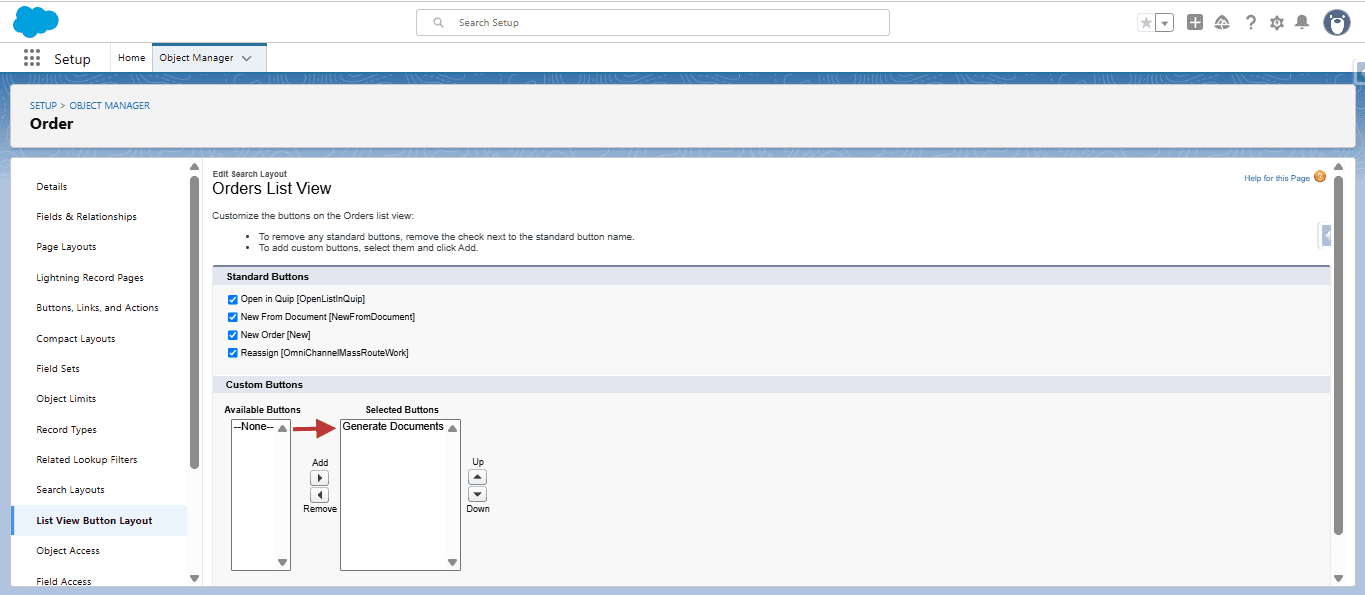
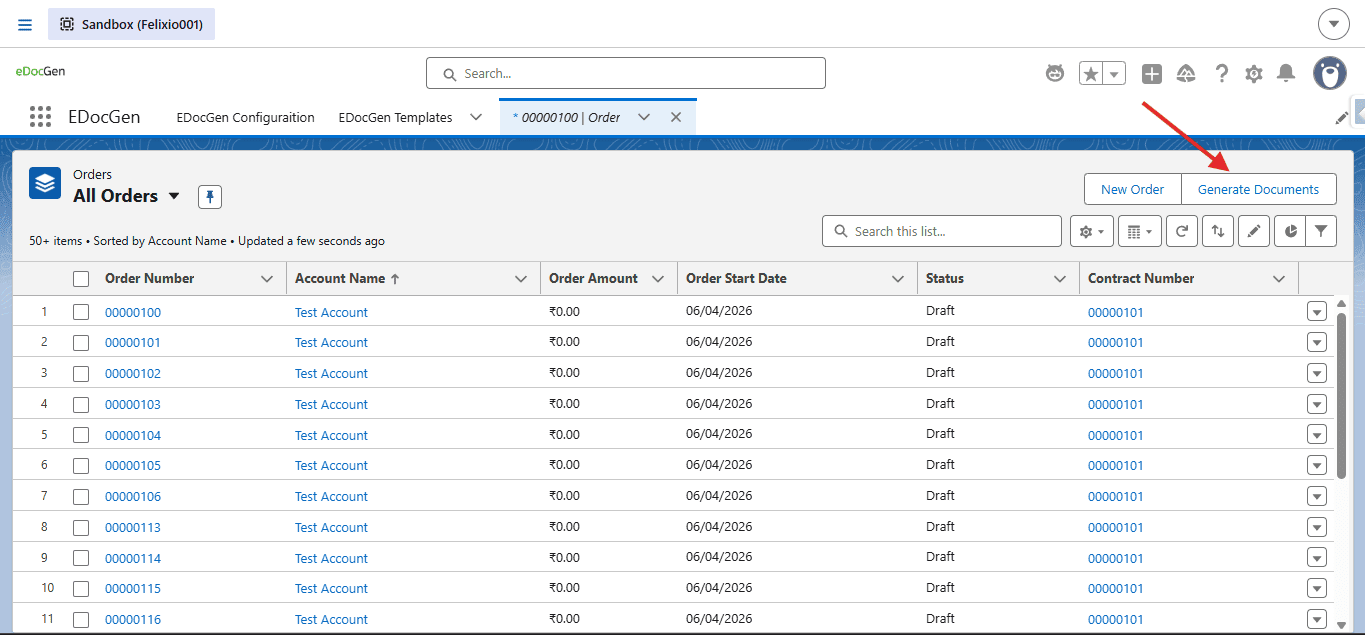
Complete this configuration before generating documents[cite: 9].
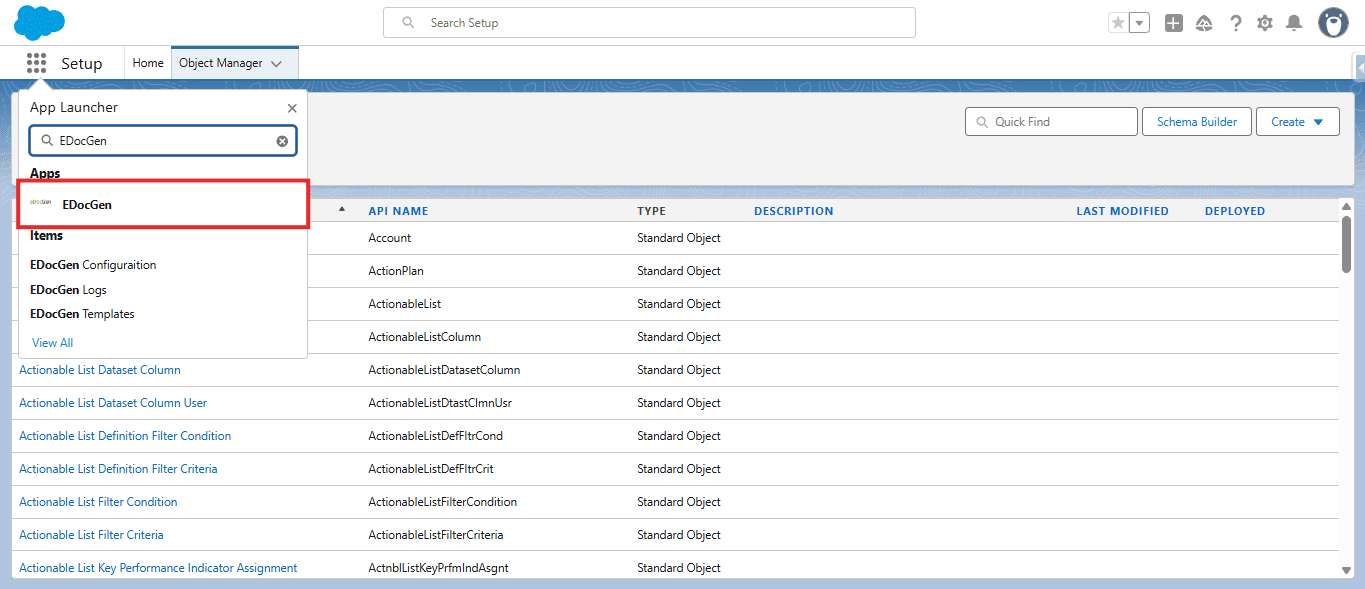
The page shows Configuration Guidelines and Configuration Details[cite: 9]:
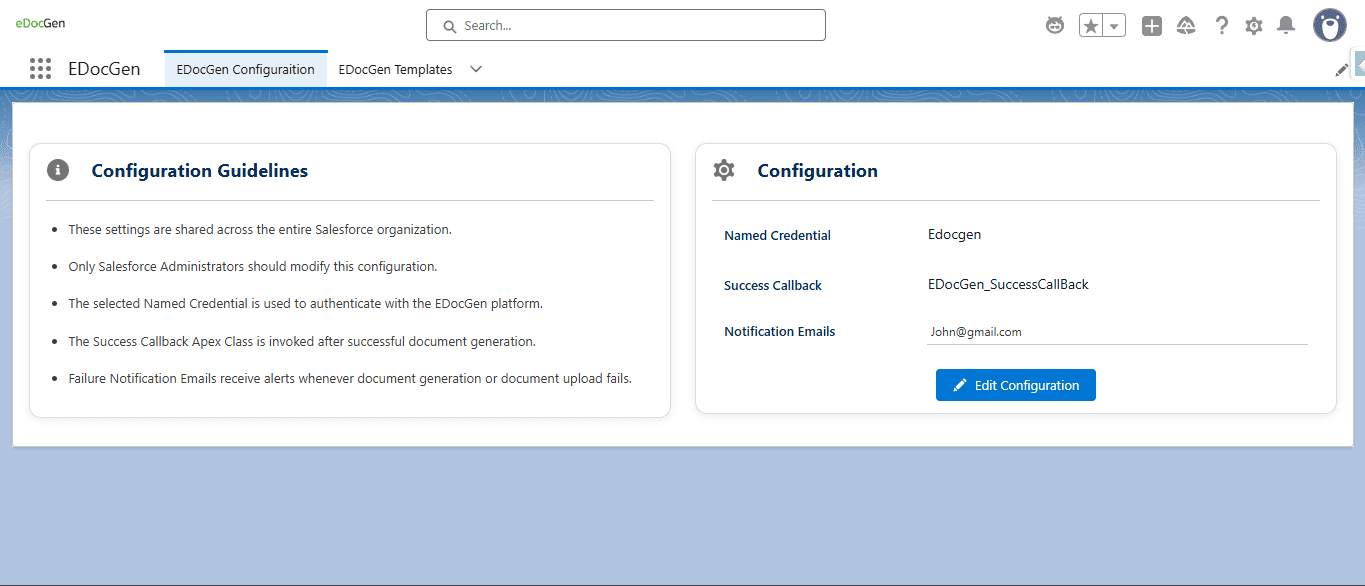
Click Edit Configuration to update the fields below[cite: 9].
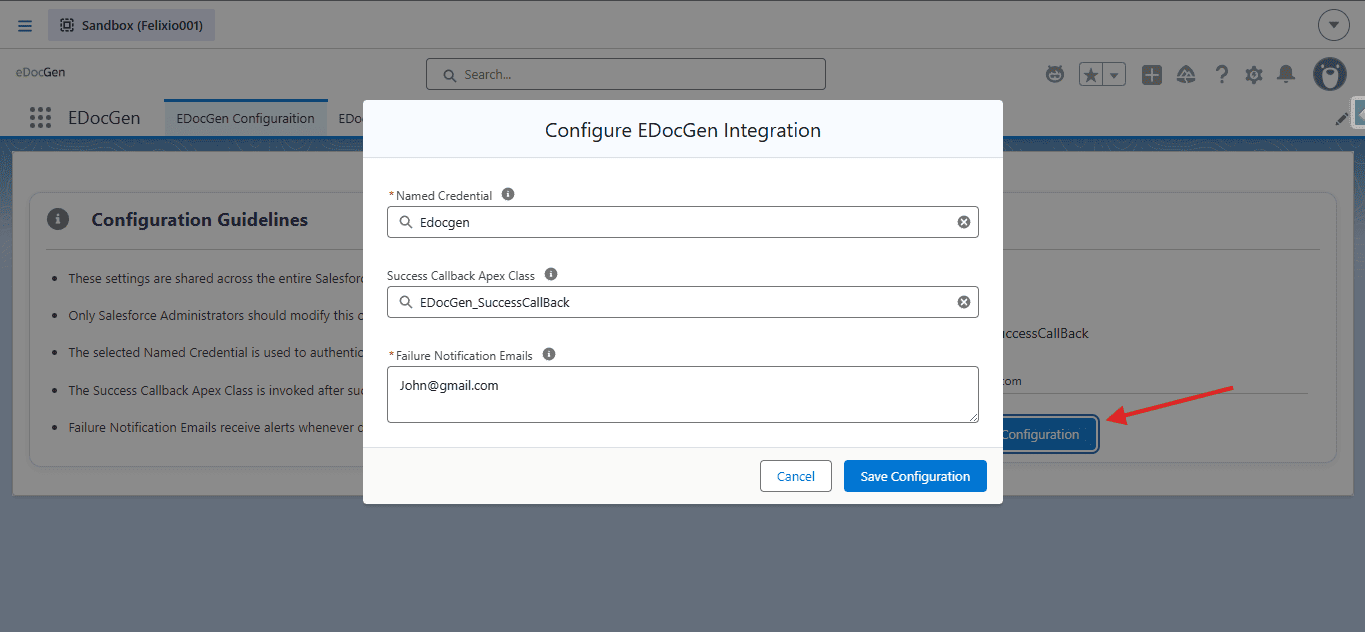
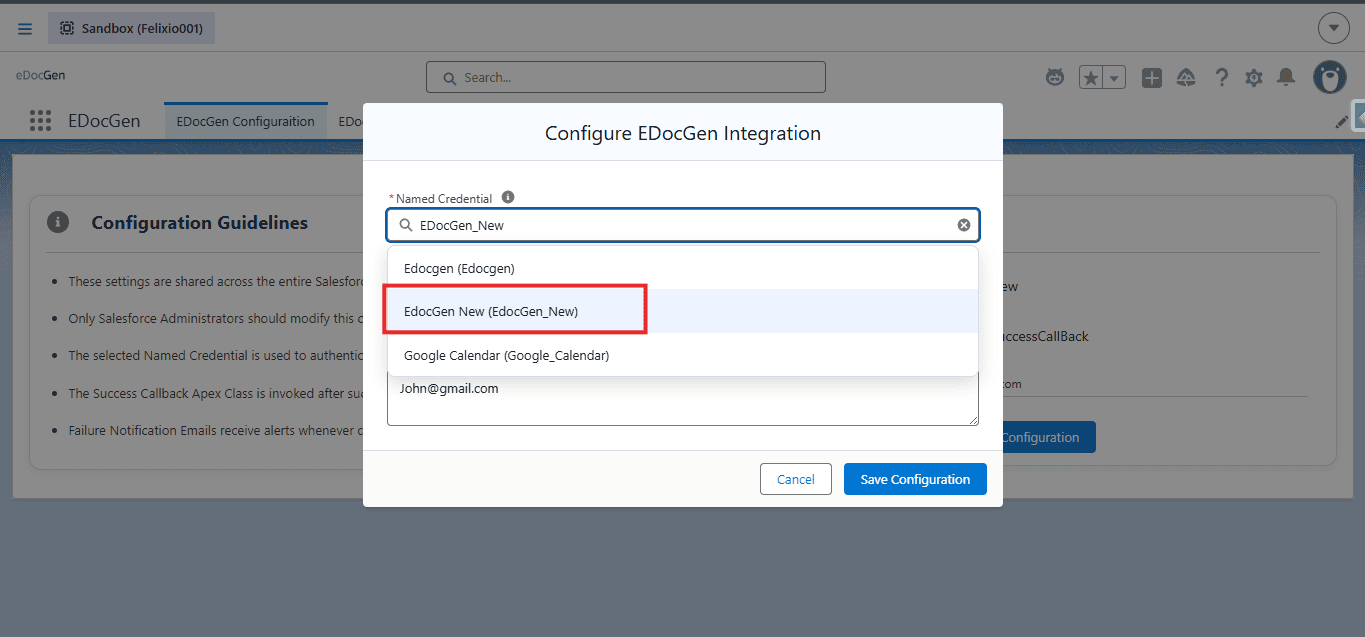
Choose which Named Credential EDocGen uses for document generation[cite: 9]. In most orgs, select the package-provided EDocGen / Edocgen credential (after you set username and password in Setup)[cite: 9].
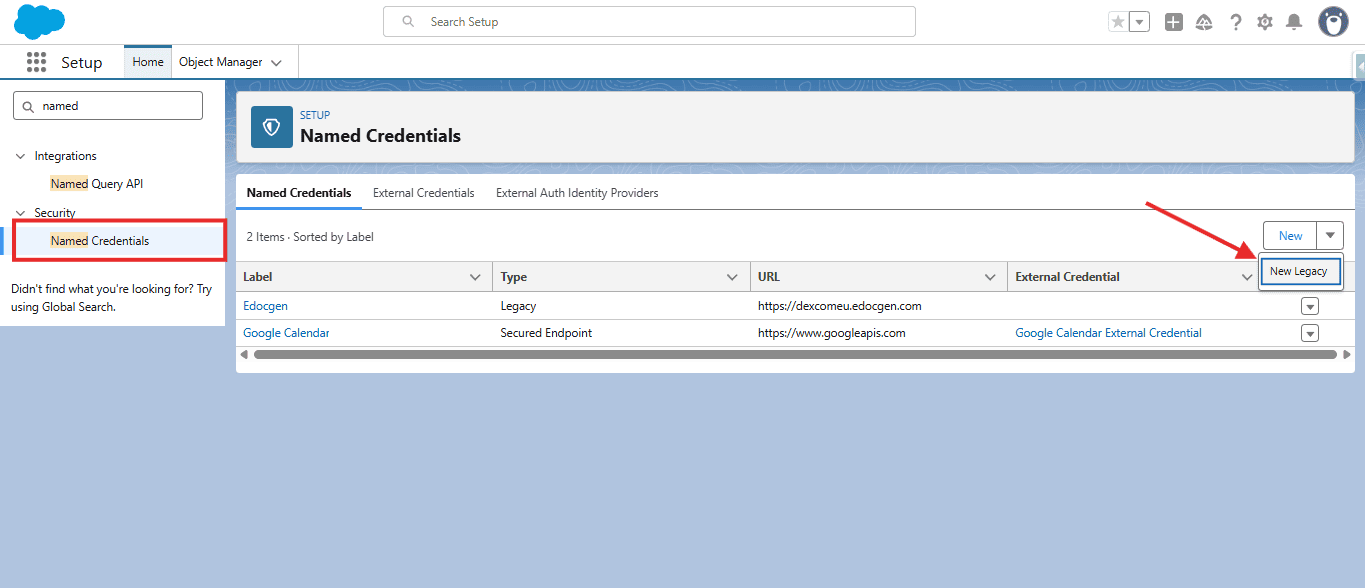
To connect a different EDocGen environment, create a new Legacy Named Credential with details from EDocGen Support, then select it here[cite: 9].
https://app.edocgen.com or another environment URL)[cite: 9]| Field | Example / guidance |
|---|---|
| Label | EDocGen New[cite: 9] |
| Name | EDocGen_New (API name)[cite: 9] |
| URL | Server URL from Support (e.g. https://app.edocgen.com)[cite: 9] |
| Certificate | Leave blank[cite: 9] |
| Identity Type | Named Principal[cite: 9] |
| Authentication Protocol | Password Authentication[cite: 9] |
| Username / Password | Values from EDocGen Support[cite: 9] |
Optional. Specify an Apex class that EDocGen calls after a document is successfully generated and uploaded[cite: 9]. Use this for custom business logic (update records, notify users, chain automation)[cite: 9].
global[cite: 9].edocgen.ConnectorToOrg.ConnectorInterface[cite: 9].global void handleDocumentGenerateSuccess(Map<String, String> generateSuccessMap)[cite: 9].global class EDocGen_SuccessCallBack
implements edocgen.ConnectorToOrg.ConnectorInterface {
// Called by EDocGen after successful document generation.
global void handleDocumentGenerateSuccess(Map<String, String> generateSuccessMap) {
System.debug(
'Inside EDocGen_SuccessCallBack.handleDocumentGenerateSuccess: '
+ generateSuccessMap
);
// Add your custom business logic here.
}
}The callback runs only after EDocGen successfully generates and uploads the document[cite: 9]. After saving the class, enter the class name in Success Callback Apex Class on the Configuration page[cite: 9].
generateSuccessMap| Key | Description |
|---|---|
templateId |
Template Id used for generation[cite: 9]. |
objectAPIName |
API name of the Salesforce object[cite: 9]. |
recordIds |
Comma-separated successful record Ids[cite: 9]. |
recordIdWithContentVersionIdMap |
JSON string: Record Id to ContentVersion Id for each generated file[cite: 9]. |
// Example
generateSuccessMap = {
  templateId = a0BXXXXXXXXXXXX,
  objectAPIName = Account,
  recordIds = 001XXXXXXXXXXXX,001YYYYYYYYYYYY,
  recordIdWithContentVersionIdMap = {
    "001XXXXXXXXXXXX":"068AAAAAAAAAAAA",
    "001YYYYYYYYYYYY":"068BBBBBBBBBBBB"
  }
}
Need full code snippets and invocation options? See the complete Apex Quickstart Guide[cite: 9].
Enter one or more email addresses that should receive alerts when document generation or upload fails[cite: 9]. Separate multiple addresses with commas[cite: 9].
Examples
admin@company.com
admin@company.com,support@company.com,salesforce@company.com[cite: 9]
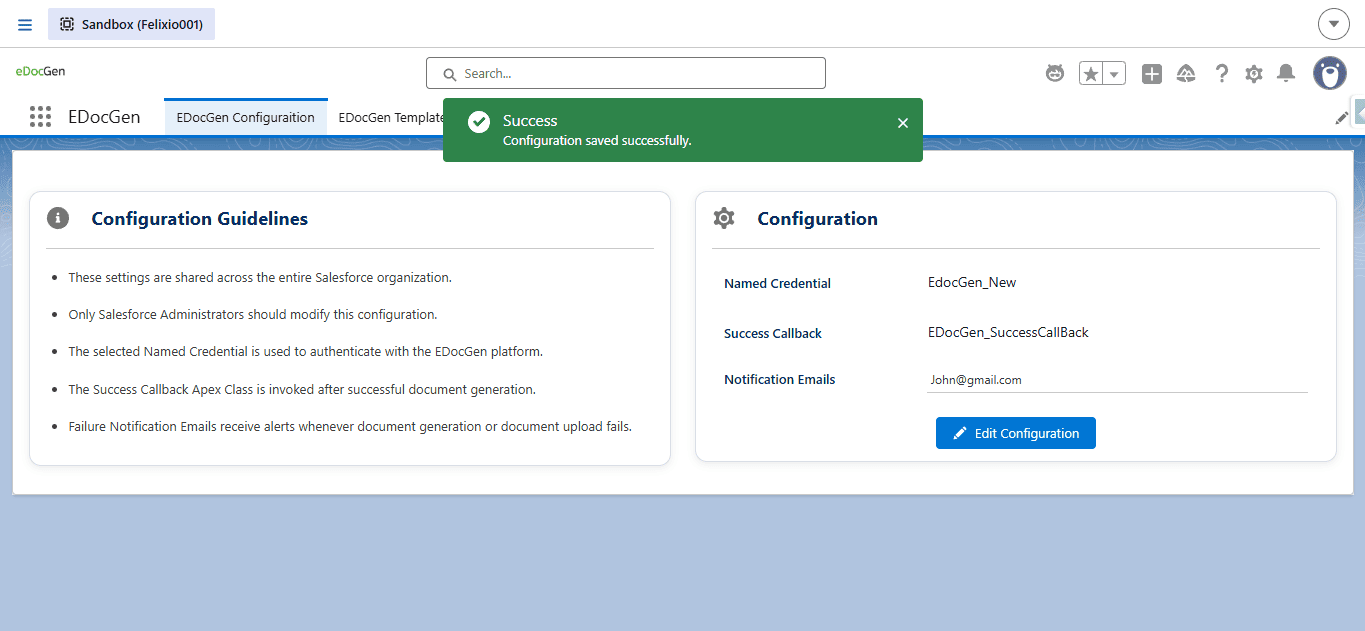
Before you start, have your EDocGen username and password ready from app.edocgen.com. If your organization needs a different server environment, contact EDocGen Support to get the correct URL and credentials. Then update the bundled Named Credential in Setup so Salesforce can authenticate to the EDocGen server. Completing these steps lets the Generate Document feature work properly across your Salesforce org.
You can add Generate Document to any object, such as Contract, Order, or Account. For single-record generation, open Object Manager, select the object, go to Buttons, Links, and Actions, and click New Action, then choose the Lightning Component action type. For bulk generation, create a List Button to use in list views. Use both options together if your team needs individual and multiple document creation.